sábado, 26 de enero de 2013

Basic Carpaint Material

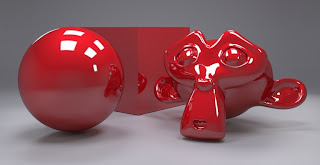
Now I'm going to introduce a light modification in the node before to create a basic carpaint material like these:


In the coated glossy node, explained in the plastic material, I have changed the diffuse node by a glossy node with GGX type. 


This produce a wide range of red colors below the reflections. I have inserted a new parameter called ShinyMultiplier. It is the rougnness of the new glossy node. It should be 0.2 or higher. I was looking for a kind of ramp diffuse node for one color. The parameters for the images above are as follows:


The color of the coating is not random. I have chosen the complementary of the base color. This is the reason of the node group name.

Bye


jueves, 24 de enero de 2013

Ceramic Material

Using the same node setup that the Plastic Material and changing its parameters you can get something like this:


Basically I have increased the weight of the glossiness.


You can download and check other setups in blendswap.

Bye

martes, 22 de enero de 2013

Plastic Material

This material is made with Blender and Cycles. I have tried to make a kind of coated glossy node.


I have mixed a diffuse and a glossy node to get a specular material. The color of the glossy node will be the color of the specular reflections. I have used RGB (0.8,0.8,0.8). It is not recommended to use (1,1,1), because of it can produce fireflies. The roughness of the glossy node will determine how sharp the mirror reflections are.

Then I have mixed this with another glossy node, but this time I have use a fresnel node as mixing factor. My aim is getting a coating above the material. For plastic this coating is weak, but I'm going to reuse this node setup for other materials.


These are the values for plastic:


I will reuse this node group in my next material.

Bye

miércoles, 16 de enero de 2013

Chrome Material

This material is made with Blender and Cycles. It is quite simple. You need to create an effect like a mirror.


In Cycles you need the Glossy node with Sharp option enabled. This setup doesn't take into account the Roughness paramenter. I have added a color ramp node, controlled by a facing layer weight node, to show a darker border outwards, which I see in some pictures, for example in Harley Davidson motorbikes:


In this node setup I have only played with the color of the material. I think it would be better mixing two glossy nodes with fresnel or facing, so it would be more accurate with reflections. About the appropiate color, it depends on the references you take. I saw accesories from many cars and motorbikes pictures (like this exhaust pipe of a Harley), and I observed that kind of gradient.

That's all.

Bye

martes, 15 de enero de 2013

Gold Material

(Edit: I have updated the metal node group in this article and in blendswap)
(Editado: He actualizado el grupo de nodos metal de este artículo y en blendswap)

This material is made with Blender and Cycles. I tried to do a kind of metal with three tones:

Este material está hecho con Blender y Cycles. He intentado hacer una especie de metal con tres tonos de color:


I mixed two main colors with a Facing factor of a Layer Weight node, and included a third color to darken the objects backwards.

He mezclado dos colores principales con el factor Facing de un nodo Layer Weight, y he incluido un tercer color para oscurecer la parte de atrás de los objetos.


This is an examples of setup:

Este es un ejemplo de configuración:

* Medium: Roughness 0.04 / 0.08
* Medio: Roughness 0.04 / 0.08

* Glossy: Roughness 0.01 / 0.04
* Brillo: Roughness 0.01 / 0.04


* Ultra Glossy: Roughness 0.001 / 0.01
* Ultra Brillo: Roughness 0.001 / 0.01


* Rough: Roughness 0.1 / 0.08
* Áspero: Roughness 0.1 / 0.08


Changing the colors and the roughness you can get several kinds of gold. You can download these and other node setups at Blendswap.

Cambiando los colores y la aspereza puedes conseguir varios tipos de oro. Puedes descargar estas y otras configuraciones en Blendswap.

EDIT (31/7/2013) / EDICIÓN (31/7/2013)

I have updated the node group including the Normal input for the material and removing one shader. I have changed a shader mix by a RGB color mix, which is more efficient.

He actualizado el grupo de nodos incluyendo la entrada Normal para el material y eliminando un shader. He cambiado una mezcla de shader (Mix) por una de color (RGB Mix), que es más eficiente.


Finally an example of my material (it was header in BlenderNation):

Finalmente un ejemplo de mi material (fue cabecera en BlenderNation):


Bye

Hasta la vista 

lunes, 14 de enero de 2013

Camouflage Material

This material is made with Blender and Cycles.

In this material the most important is the color pattern. This is my node setup for this kind of pattern using four colors:


I divide this material in three levels:
1.- Two main colors (green and beige). I use Noise Texture to blend them.
2.- Some big spots (brown). I use Noise Texture to blend it with the level before. Use a mapping node to ramdomize this spots, playing with location and rotation values.
3.- Some small spots (black). I use Musgrave Texture to blend it with the levels before.
In all cases I use color ramp nodes, with constant interpolation, joined to texture nodes, to create irregular spots without blending zones. You can play with their stops to increase/decrease the size of the spots.


Once you have your pattern you can included in some clothes configuration (this is by marcoG_ita): 


You can find other similar materials in blendswap (by @kaluura).

EDIT: Now you can also download my material in blendswap.

This and other materials also in Blenderartist.

Bye
Este sitio emplea cookies de Google para prestar sus servicios, para personalizar anuncios y para analizar el tráfico. Google recibe información sobre tu uso de este sitio web. Si utilizas este sitio web, se sobreentiende que aceptas el uso de cookies. Más información Entendido