miércoles, 20 de marzo de 2013

Anodized Metal Material Step by Step

Hi. In this post I'm going to do a step by step guide of the anodized material showed before.

Step 1: Just a glossy node. This is what you get if you plug a glossy node to de material output (roughness 0.1). There aren't highlights.


Step 2: It is a mix between the node before and another glossy node, now with white color. Highlights appear this time. This node setup will be the same for all the next steps. I'm only going to change the red glossy node for other nodes.


The result is similar to anodized metal, but I'm going to add more hues in next steps.


If you use a red diffuse node instead the red glossy one, you get a material similar to ceramic, not to metal. This is not the material I want.


Step 3: In next steps I'm going to change only the red glossy node shown in step 2. In this step I have only changed the color, using a bright/contrast node:


This scene is darker than in step 2.


Step 4: Similar to step 3, but using a positive bright value to get a clearer scene.


This scene is too much clear than in step 2.


Step 5: In this case I mixed the color from step 3 and step 2, in the same glossy node (rough 0.1). Both colors are mixed using a fresnel node. So the clear red will be use for fresnel output near to 1 and the dark red for output near to 0.


In general, the result is darker than in step 2.


Step 6: In this case I have mixed the color of step 3 and 4. As the step before, a fresnel node is used for mixing this colors.


In general, the result is clearer than step 2.


Step 7: In this step I'm going to mix the glossy nodes got in steps 5 and 6, using a layer weight >> facing as mixing factor.


The result is not bad, but I prefer a clearer material.


Step 8: I increase the facing factor to 0.3, to make the first glossy more evident.


 A bit clearer. I think is better than step 7.


Step 9: Here I try another strategy: using a fresnel factor as facing value. So the the facing value goes from 0 to 1, using a fresnel of 1.45:


The resulting color is good. Now the material is more red and less dark. But it is too much glossy.


Step 10: I increase the roughness of the glossy nodes to 0.3.


 This material is nice but is not what I'm looking for. It has lost its glossiness.


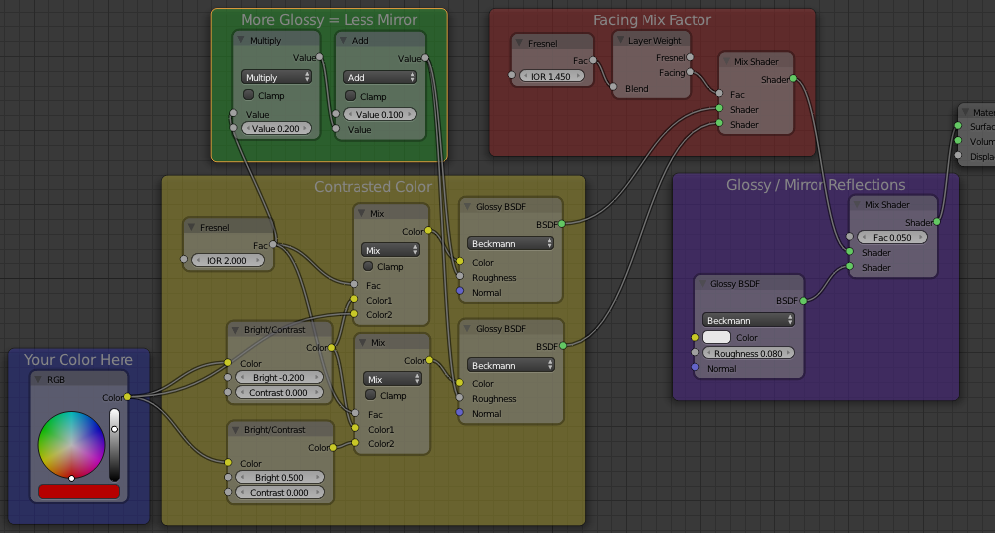
Step 11: I try again a fresnel factor for the roughness parameter. I want to change the roughness depending on the light and camera angle. I want the roughness has a minimum value of 0.1 and a maximum of 0.3. So I multiply the fresnel by 0.2 and add its result to 0.1. So for fresnel output equal to 1, roughness will be 0.3, and for fresnel output equal to 0, roughness will be 0.1. I use a fresnel value of 1.45.


As in step 9, the material is still too much glossy.


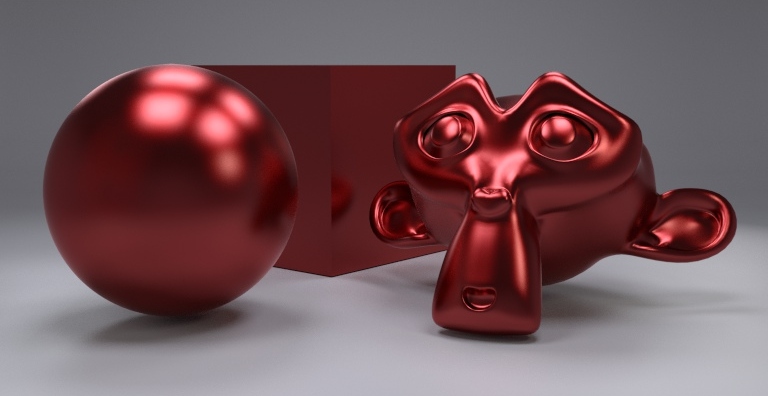
Step 12: I increase the last fresnel value to 2.0.


This is the final result. 


I hope this brief guide help you to understand the anodized material.

Bye

Blender Cycles: Facing Reference in Layer Weight Node

Here it is a brief reference about facing mixing with layer weight node.

This is the node setup I have used for this test:


And these are the results:

Facing 0.1


Facing 0.3


 Facing 0.5


Facing 0.7


Facing 0.9


Bye

Blender Cycles: Fresnel Reference in Layer Weight Node

Here it is a brief reference about fresnel mixing with layer weight node.

This is the node setup I have used for this test:


And these are the results:

Fresnel 0.1


Fresnel 0.3


Fresnel 0.5


Fresnel 0.7


Fresnel 0.9


Bye


martes, 19 de marzo de 2013

Anodized Metal Material

Hi everybody. Today I'm going to show you an anodized metal material.


I found this material looking for a base color for a carpaint material, but I think it is interesting by itself.

The node setup is a bit complex. It consists of a double glossy nodes mix, with a facing factor. I used two contrast nodes and mix colors to get different hues from one color.


The factor for roughness tries to get a less mirror effect in the glossier zones. These are two carabiners that use this material:


Hires version is available here.

I hope you like it.

Bye.

lunes, 18 de marzo de 2013

Black Leather Material

Hi everybody. Today I'm going to try to make a black leather material.


The most important in this material is to get the leather texture. If you see some examples like this, leather texture has a pattern similar to some overlapped distorted grids. Probably this material is not good enough for a close-up image, but I think it could be useful for cars interior, clothes or furniture. This is the node setup I have made:


I have mixed both bands textures with the darken feature. See here in this post for color mix modes examples. After mixing, I have added a invert node and a gamma node to flatten the texture. So the bubble look disappears. I have tried to make a subtle bump effect here:


Note that bump feature is still experimental, and it is a target to improve in blender version 2.67.

This material is black leather and it hasn't hues. In the next post I will show you brown leather with some improvements.

You can download a newer version of this texture in blendswap.

Bye

jueves, 14 de marzo de 2013

Car Paint with Flakes Material

Hi everybody. Today I'm going to make a car paint with flakes material.


I have used a voronoi texture to mix flakes with different colors. I have tried to make a material that works with only one color (called base color in its frame), so changing it, directly you get other car paints.


For getting the flakes I have included two glossy nodes, one with the base color and the other with a 
contrasted version. After mixing the flakes, I have included the usual fresnel reflections, common in 
car paint material.

This is the Mike Pan's BMW with this material:


In this thread you can get very interesting stuff and ideas for your materials.

Bye


miércoles, 6 de marzo de 2013

Satin Fabric Material II

Hi everybody. Today I'm going to show to you a new version of satin fabric material, explained on this post.


I have used the double glossy mix, as previous version. I have used the same color ramp for each glossy node, and different fresnel factors to mix these colors.

The colors of the color ramp node are: #2F2DD2, #1E8BDB, #E7ADD3 and #E5E374.

As the result, you can see a pinkish forecolor, and a bluish backcolor.
 

 Bye

viernes, 1 de marzo de 2013

Jewelry Gold Material

Hi everybody. Today I'm going to show you my jewelry gold material.


The material has five parameters: three colors (fore, middle and back) and two roughnesses (one for two previous colors and another different for the last).


This is a modified version of the material explained in this post. I used a layer weight - facing node to mix forecolor and middlecolor, and a dot product of incoming and normal vectors to mix them with the backcolor. So this last mix node depends on the angle between incoming and normal coordenates.

 
You can download this and other gold node setups in blendswap.

Bye

Este sitio emplea cookies de Google para prestar sus servicios, para personalizar anuncios y para analizar el tráfico. Google recibe información sobre tu uso de este sitio web. Si utilizas este sitio web, se sobreentiende que aceptas el uso de cookies. Más información Entendido